At the heart of Siplicity, there is a simple, but flexible, metadata model. Metadata, for files and folders, is stored as a tree of namespace/name/value nodes. Nodes can have children. Values are just strings.
There’s a special SCHEMA node in Siplicity that keeps track of the metadata terms being used in a particular session. There’s not much else special about it: it stores the schema in the same metadata structure described above, except without any values.
This looks like this:
          ns:name
            |
  ---------------------
  |         |         |
ns:name  ns:name  ns:name
            |         |
       ----------     --------------------
       |         |    |          |       |
    ns:name  ns:name  ns:name  ns:name  ns:name
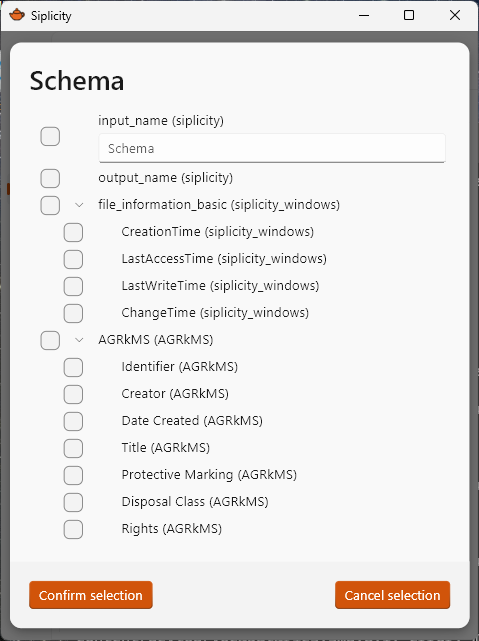
The SCHEMA node is updated automatically during a Siplicity session (e.g. if you run a checksum job, it might add the schema terms for checksum algorithm and checksum result). In the data entry pane, when you select fields to edit, you are selecting from the fields available on that SCHEMA node.
Over the past few months I’ve been working on a mechanism for end users to attach their own custom vocabulary terms to the SCHEMA node. To enable, for example, working with DC Terms or the PREMIS vocabulary.
TOML
End users can now add custom vocabularies by encoding their schema into a TOML file.
Here’s an example, showing the full complexity you can achieve:
namespace = "test" // namespaces are inherited, can be overriden below
name = "root" // name of root metadata node, if omitted, fields will sit at the top level of the schema
fields = [
    "simple",
    { name = "parent", fields = [
        "simple child",
        { name = "another", namespace = "distinct", fields = [
            "enough",
        ] },
    ] },
]
This translates to this tree of namespace/name pairs:
          test:root
            |
  ------------------
  |                |
test:simple  test:parent
                   |
       -------------
       |           |
test:simple child  distinct:another
                   |
                   distinct:enough
It’s a little dense, I know, but there’s a simplified form that you can use for a flat schema where all the terms sit in a single namespace:
namespace = "AGRkMS"
name = "AGRkMS"
fields = [
  "Identifier",
  "Creator",
  "Date Created",
  "Title",
  "Protective Marking",
  "Disposal Class",
  "Rights",
]
Settings
Once you’ve created your TOML file, it needs to be saved within a “vocab” folder, within the “definitions” folder of your “siplicity” home directory.

On a Windows install, you can find the “siplicity” home directory within the hidden “AppData” directory, e.g.:
c:\Users\richardlehane\AppData\Local\siplicity
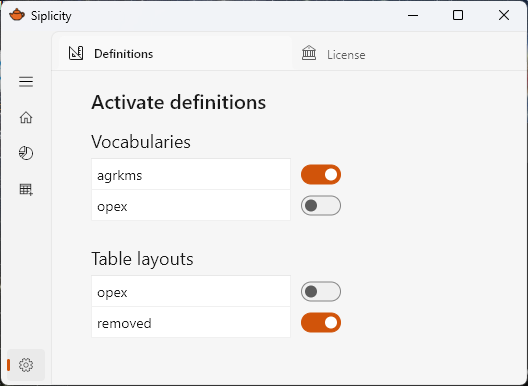
Activation
The next time you start Siplicity it will be loaded and the final step is to activate it. To do this, go into the “Definitions” tab of Siplicity’s settings menu, and activate the toggle for your vocabulary:
Using your new terms
Once that’s all done, you can start using your terms. When selecting fields for editing in the data entry pane, they will appear like this: